Monday, February 28, 2011

Cameos & Cakes with Kristii Lockart

Happy Monday everyone!!! It's hard to believe that today is the last day of February, but hopefully March will come in like a lamb and we will see some signs of spring!!! The weather has been so cold lately, I have been dreaming of tropical breezes and I find myself scrapping with soft pretty colors that remind me of spring! Glitz Designs papers are perfect for those of you who are like me and want to make some soft pretty cards that remind you of spring!

In my first card I used some Love Nest papers along with the cameo image from the Scarlett Collection. I trimmed the edges of the cameo and glued some Tim Holtz Lavish Trimmings to the backside, making a sweet little focal point.
Supplies Used:
Glitz Designs "Love Nest Collection" papers: Stripe and Floral
Glitz Designs "Scarlet Collection" Cardstock Stickers
other supplies: Cardstock: PTI Rustic White and Bazzill yellow; Tim Holtz Lavish Trimmings; Papertrey Ink buttons; lace, stick pins and ribbon from my stash.
For my second card I decided to make a fun little birthday pocket. The Hoopla Collection is perfect for everything birthday!!!
Here's a peek at the tags that are inside:
and here's a close-up of the Glitz Hoopla embellies:
Supplies Used:
Glitz Design "Hoopla Collection" Polka
Glitz Design "Hoopla Collection" Glitzers
Glitz Design "Hoopla Collection" Cardstock Stickers Titles
Glitz Design Distressed Couture Flower Stamp
Other Supplies: Prima Florals; Recollection Florals; PTI Stamps Signature Series Dress Form and Make a Wish; PTI button, twine and Vintage Cream Twill; Martha Stewart Glitter; Tim Holtz French Script Stamp; ribbon and lace from my stash.
Thanks for stopping by!!! I hope you have an absolutely amazing week!
Kristii

Friday, February 25, 2011

Belated Valentine's with Carla Peicheff

I realize we're a few days past Valentine's Day, but if you're anything like me, you're not *always* on time with everything and create things a little late once in a while! ;) lol!

So today I have 2 more Valentines Day/Love cards to show you using more gorgeous Glitz Design Love Nest goodies!


Materials:
  • Glitz Design Love Nest Collection (Damask & Polka)
  • Glitz Design Icing (red & black)
  • Glitz Design Rub-On (Love Nest)
And one more Vday card!


Materials:
  • Glitz Design Love Nest Collection (Damask, Polka, & Floral)
  • Glitz Design Icing (red & black)
  • Glitz Design Whatnots (Hoopla) *These are absolutely AWESOME!!! You get one for each month! Sooo darn cool!
I hope these inspire you to get your last minute "love" cards done & sent out! ;) Have a wonderful day and thanks so much for stopping by!

Thursday, February 24, 2011

Celebrating Valentine's Day with Michelle Jackson-Mogford

Hi all
Today I'd like to bring you a bit of love from Glitz Designs as February is the month of love :) I was a very lucky girl this past valentines day and my wonderful hubby spoilt me rotten. We'd not long been back from our holiday to Mexico before valentines day and a couple of days later hubby was off on his travels again for 3 weeks so he decided to take control of the day and all I can say is the boy done good :) The lovely Glitz lines are perfect for all you love layouts and for this project love nest was perfect .... just like my valentines day ..


This is the list of Glitzy goodies I used
Glitz Designs Love nest papers; Sky, Damask and Floral
Glitz Designs Love nest rub ons
Glitz Designs Love nest What not
Glitz Designs Teeny alphas; Baby pink block and brown block.


I distressed the edges of the brown wrapping paper 12 x 12 and mounted my 3 photos on to some of the damask paper, distressing and creasing the edges for extra dimension as well as building them up in layers on foam pads.


I cut out some of the flowers and leaves from the floral paper to create embellishments, distressing and curling them into shape.


The large rose is one of the lovely what nots, to give it some movement I snipped into the leaves so I could lift them over the edges of the photos.


And the final touches were the journalling block from the what nots a couple of the pretty rub ons and my favourite, some teeny alphas. I'm glad I have a record of a wonderful day.

Now, I love my Husband and my family and of course my friends but the other two great loves of my life are these guys


My lovely furry best friends. Whatever happens in life, they always love me, they're great listeners, they make me laugh and are perfect for cuddling :) I love the colours in the Scarlett collection too and they were perfect for my layout, here's what I used;
Glitz Designs Scarlett papers; Polka, Bouquet and map.
Glitz Designs Scarlett Glitzers
Glitz Designs Scarlett Paper layers
Glitz Designs Love nest Cardstock stickers, titles
Glitz Designs Paisley flourish rub ons
Glitz Designs Vintage extras rub ons
Glitz Designs Teeny alphas black round


I distressed the base 12 x 12 paper and then really went to town distressing the map paper, ripping out the centre and rolling the paper back to create a frame.


I layered up papers and stickers


Added rubons to tie the layers together


And adhered the heart with foam pads to add some dimension to the layout, decorating it with the teeny alphas and the glitzers .... well a bit of bling is never out of place :)

I hope you've enjoyed my little Glitz love in and thanks for stopping by
Love
Mx

Wednesday, February 23, 2011

Celebrating Love with Michelle Philippi

I'm still celebrating the month of love - are you? Each month comes with its own focus and inspiration, and February for me is one of holding near and dear those that we often forget to...or take for granted even. Picking up the phone and calling a girlfriend whose voice you haven't heard in forever because you only correspond via e-mail, dropping a card in the mail to someone who you haven't heard from in the longest time. Little sweet gestures to celebrate all the loves that we have in our lives.

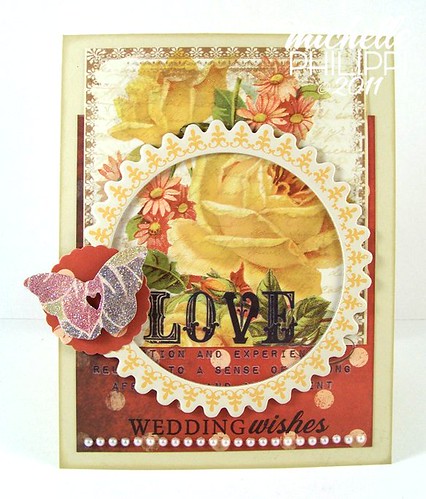
A wedding card...for the classic celebration of love.

WeddingWishes_01_23_11

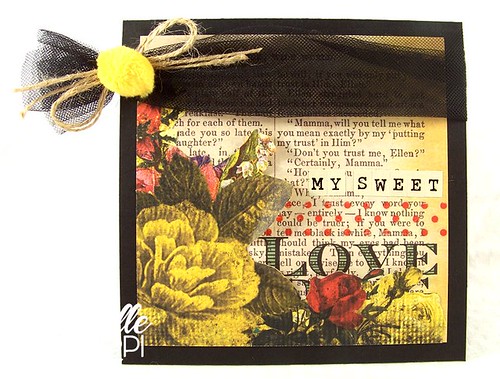
And a card for my daughter. I was thinking my husband at first but now I am thinking too girly even for a love occasion to your spouse.

MySweetLove_02_19_11

Wedding Wishes
Glitz Design "Love Nest" Paper: Polka & Floral
Glitz Design "Vintage Love" Rubons
Glitz Design "Scarlett" Whatnot

My Sweet Love
Glitz Design "Scarlett" Paper: Polka
Glitz Design "Scarlett" Paper Layer
Glitz Design "Love Nest" Rubons
Glitz Design Black Tulle
Glitz Design Yellow Pom Pom
~ Michelle

Tuesday, February 22, 2011

Gifts of Love with Emeline Seet

Still celebrating the month of Love, here are some items created in honor of love.

I love the idea of envelops and pouches. And so I thought how perfect would it be to create a handmade paper envelope to slip in tags and little love notes.


Supplies:
Glitz Design Love Nest Paper "Damask"
Glitz Design Love Nest Paper "Sky"
Glitz Design Love Nest Cardstock Stickers

The next off the page item was inspired by a small disposable paper cup.
I wrapped the mini paper cup with crepe paper (edge decorated with stickles) and covered the bottom section with soft dusty pink pattern paper (Glitz Design Love Nest Paper "Damask").

This tiny pretty baskets holds Love/Heart themed handmade embellishments.


Supplies:
Glitz Design Love Nest Paper "Damask"
Glitz Design Maya Paper "Polka"
Glitz Design Giant Rhinestones - Pink
Glitz Design Scarlett Paper Layers

Thanks for dropping by and have a fabulous day !
Emeline

Monday, February 21, 2011

Cards to Adore with Laurie Schmidlin

Good morning!  In keeping with this month's theme, I have created a couple of Love cards to share with you today!  The wonderful thing about love is that it can be celebrated all year long!  Weather it's for Valentine's Day, a Wedding Anniversary, or just because...cards celebrating love are always in style!  :-)
  GD Adore
I started with some yummy Love Nest papers and then added a cardstock frame around the Love Nest rub ons.
GD Adore Close-Up2
Because I love me some sparkle :-), I added some Stickles to the flowers!
GD Adore Close-Up1
In this photo, you can see the ruffle I created using some red Glitz Tulle and my sewing machine.
GD Adore Close-Up3
For the finishing touch, I added a cream bow with a red giant rhinestone in the center!
GD The Journey
On my next card, I created a vellum pocket to hold a removable note.
GD The Journey2
This little "love note" can also later be used as a bookmark!
  GD The Journey3
Thanks so much for dropping by today!  ~Laurie

Adore Card
Glitz Design Love Nest Papers:  Damask, Polka
Glitz Design Love Nest Rub Ons
Glitz Design Tulle
Glitz Design Giant Rhinestones
Other:  Choice Buttercream c.s. (TE), Oval Nestabilities, Top Note Die (Sizzix), Stardust Stickles (Ranger), Vanilla satin ribbon (SU!), Sewing machine
The Journey Card
Glitz Design Love Nest Paper - Block
Glitz Design Hoopla Paper - Polka
Glitz Design Love Nest Whatnot
Glitz Design Cardstock Sticklers - Love Nest Titles
Glitz Design Scarlett Stamp
Other: Kraft and Vellum cardstock, Dew Drops, Wrinkle ribbon, Whimsy Threads (Webster's Pages), Button string, Miniature rose, Sewing machi

Friday, February 18, 2011

What You Love with Leah Farquharson

Honestly, I've learned the hard way by searching - it's best to do what you love, and be with the person you're happy with. Even if those things sometimes take sacrifice, it's so worth it!

Glitz Designs Love Nest Paper Sky
Glitz Designs Scarlett Paper Polka
Glitz Designs Scarlett Whatnots, Titles, Paper Layers, Peek-a-Boo
Glitz Designs Tulle
Glitz Designs Giant Rhinestones Clear, Red, Aqua
Glitz Designs Teeny Alpha Red
Other:
Ink: Tattered Angels
Handmade crochet flower: me
puffy letters: American Crafts


Gliz Designs Hoopla Paper Frames
Glitz Designs Hoopla Titles, Journaling, Glitzers, Whatnots, Rubons
Glitz Design Love Nest Whatnots, Rubons
Glitz Designs Giant Rhinestones Clear, Aqua, Red
Glitz Designs Teeny Pink Alpha
Glitz Designs Stamps Distressing Set 3
Other:
Doily: Wilton
Ink: Tattered Angels, Ranger
Ribbon: Crafts Supply

Thursday, February 17, 2011

Vintage Touched Cards with Kristii Lockart

Hi there dear friends!!! I'm excited to share with you some more Glitzy Goodness! The first card I have for you today features a soft romantic feel using Glitz Design's Love Nest Collection. I thought it would be fun to make a little card and tag set for a Valentine's Day gift.
I ended up making two tags and using one of the tags as a focal point on the card. I really like how colorful this project turned out. These papers by Glitz Design are absolutely gorgeous!!! Here's a close-up of the tag:


Supplies Used:
Glitz Design "Love Nest" Papers: Floral, Stripe, and Damask
Glitz Design "Hoopla" Papers: Polka
Glitz Design "Love Nest" Titles
other: PTI cardstock Rustic White; PTI Tag Sale #1 die; PTI sweet blush ribbon and button twine, Prima floral; Martha Stewart glitter, lace, trim and chipboard heart from my stash

The second card features a cute little vintage image from the Scarlett Collection.
Aren't those two little Love Birds adorable!!Supplies used:
Glitz Design "Love Nest" Paper: Polka
Glitz Design "Hoopla" Paper: Pipework
Glitz Design "Scarlett" Paper: Map
Glitz Design "Scarlett" Titles
Glitz Design Cardstock Stickers Vintage Journaling
Glitz Design Teeny Black Alpha
other supplies: PTI Cardstock: Kraft and Rustic Cream; PTI Ribbon and Twine: Vintage Cream; Melissa Frances frame; Glossy Accents.

Thanks for stopping by!!!
Wishing you a very Glitzy day!!!
Kristii

Wednesday, February 16, 2011

Romantic Frame & Jewelry Box with Tammy Tutterow

Adore1
The colors in the Love Nest collection are perfect for love inspired project.  For this frame, I re-faced a small box frame that I found at my local Target store on clearance for $2.50.  I applied Damask patterned paper to the front and sides of the frame.
Adore9
Adore2
On the front of the frame, I used the music scale stamp from the Distressing 2 stamp set using Brushed Corduroy Distress ink.  I used the same ink to all of the edges on the frame.  In the top left corner, I added a swallow Glitzers sticker.
Adore4
In the lower corner, I layered a Love Nest Glitzers frame onto Love Nest Whatnot.  I distressed the edges of the Whatnot with a Distrezz It All tool and inked them using Brushed Corduroy.  I added a cluster of flowers tied off with a bit of brown Tulle and crinkled ribbon.  I added two green flourish Love Nest Glitzers with the flowers to look like leaves.  I finished off the cluster with a Love Nest Rub On phrase applied to a scrap piece of a previously used Whatnot that I had trimmed.
Adore5
To create the flowers, I die cut a piece of Love Nest Paper Layers using the Tim Holtz Tattered Florals Die.  I spritzed the flowers with a pink shade of Glimmer Mist.  When dry, I added Brushed Corduroy Distress Ink to the edges.  I lightly distressed the petals with the Distrezz It All tool.  I folded two flowers into a cone shape and wrapped the tip with floral wire to create a stem.
Treasure1
For my second project, I re-covered an small wooden jewelry box that I found on clearance at Hobby Lobby for $5.00.  I used the Love Nest Polka patterned paper (the dots were a perfect match to the original color of the box) to cover the top lid and the drawer fronts.
Treasure4
On the top of the lid, I layered several elements together to add decoration.  The base layer is a large Love Nest Peek-a-Boo.  The print on the piece is bright red.  The reverse side of the print is pinkish and much softer looking so I place it print side down.  On top of the Peek-a-Boo, I added a Love Nest Whatnot to which I applied a couple of Love Nest rose Rub Ons.  The next layer is another Peek-a-Boo.  I added a phrase to a scrap of patterned paper using the brown Teeny Alpha stickers.  I stapled the strip onto the top of the piece and adhered it all to the top of my box.
Supplies
Frame:
  • patterned paper: Glitz Design Love Nest Damask, Love Nest Paper Layers
  • stickers: Glitz Design Love Nest Glitzers, Garden Glitzers
  • rub ons: Glitz Design Love Nest Rub Ons
  • elements: Glitz Design Love Nest Whatnots
  • ribbon: Glitz Design Tulle, crinkled seam binding
  • stamp: Glitz Design Distressing 2 stamp set
  • ink: Tim Holtz Distress Ink Brushed Corduroy
  • adhesive: Claudine Hellmuth Studio Multi Medium, Therm O Web Super Tape, Helmar 450 Quick Dry

Jewelry Box:
    • patterned paper: Glitz Design Love Nest Polka
    • stickers: Glitz Design Teeny Alphas, Brown
    • rub ons: Glitz Design Love Nest Rub Ons
    • elements: Glitz Design Love Nest Whatnots, Glitz Design Love Nest Peek-a-Boos
    • ink: Tim Holtz Distress Ink Brushed Corduroy
    • adhesive: Claudine Hellmuth Studio Multi Medium, Therm O Web Super Tape, Helmar 450 Quick Dry

    Tuesday, February 15, 2011

    Always Time for Love with Iwona Palamountain

    It's my turn for a Glitz Design post, and I whipped up some Valentine's Day goodness for you.
    Oh yes, while we might have to wait for another Valentine's Day for a full year, I still feel love in the air... don't you? Besides, there's ALWAYS time to share love!
    As far as the love theme goes, there's no other collection that I would reach for, but Love Nest. It's such a versatile collection, with an assortment of bold and subtle patterns and a wonderful vintage touch.
    I simply adore combining textures, and that's what I was trying to achieve on my first card. The homespun touch of doily lace and velvet ribbon is contrasting nicely with the shimmer of rub-ons and Glitzers. Decadent is good :)

    Glitz Design "Love Nest" Paper: Polka
    Glitz Design "Love Nest" Journaling Cardstock Stickers
    Glitz Design "Love Nest" Glitzers
    Glitz Design Metallic Rub On: Fleur De Lis
    Glitz Design "Scarlett" Paper Layer

    Other: cardstock: Papertrey Ink (Rustic Cream); stamp: Layers Of Color; ink: Versa Color (Bark), Versafine (Onyx Black); velvet ribbon; crocheted doily: Kaisercraft; twine: AnnaBelle Stamps; vintage button

    For my next card, I decided on a calmer and more stylish look. True to my style, I couldn't pass on a big fat bow, but what I really love about this card, is how well the Rub Ons: birdcage and sentiment, look together. Isn't it a match made in heaven??

    Glitz Design "Love Nest" Paper: Block, Stripe, Damask
    Glitz Design "Love Nest" Rub Ons
    Glitz Design Giant Rhinestones: Pink

    Other: cardstock: recycled kraft; ink: Papertrey Ink (Fresh Snow), Grant (silver); wrinkled ribbon; crocheted lace; chipboard hearts: Collections; rhinestone strip: Top Line Creations; vintage buttons

    I hope you enjoyed your visit today! Sending you a belated but sincere Valentine-y smooch,
    Iwona (Chupa)

    Monday, February 14, 2011

    Love is in the Air with Tracie Hudson

    Happy Valentines Day to you all....a day to celebrate being in LOVE and being LOVED.


    Using the soft tones of Glitz Love Nest and some chipboard pieces, I created this free standing frame as a gift of LOVE for my husband.
    The chipboard pieces were covered with patterned papers and layered on top of one another to create this dimensional home decor piece.
    The blooms were created using scraps of paper, to which I added puff paint in order to create extra texture.


    Supplies - Love Nest Block L2020 and Sky L2006; Scarlet Journaling Stickers C2204; Frosting; Glitz Tulle; Teeny Alpha C2327


    My boys are the LOVE of my life - we have a secret code that we use between ourselves, when we are ending SMS text or email messages to one another - 1.4.3 - it means I LOVE YOU.


    Supplies - Hoopla Titles C2174; Glitzers G2105; Peek-A-Boo PAB2280; Floral H2969,Frames H2921, Pipework H2945 and Cake H2938; Frosting F2884; Teeny Alpha C2808.


    and finally I LOVE my home, its the one place in the world where I know I am LOVED.


    Supplies - Hoopla Frames H2921; paper layers; Frosting; Teeny Alphas C2358; Love Nest cardstock stickers.

    This box framed home decor piece was created by punching out small blooms from scraps of patterned papers. A single Glitz Frosting gem was added to the center of each bloom, before they was attached to a chipboard heart. The heart was then attached to one of Glitz Paper Layers and simply popped in to an inexpensive box frame.

    I hope that your Valentines Day is filled with LOVE and happiness.

    Thanks for dropping by.
    T.x.